You can link your custom domain to your Blogspot blog, whether or not you currently have a hosting plan. The process simply depends on where your DNS is being managed. Below are clear step-by-step instructions for both scenarios.
Log into your Blogger account.
Option 1: Mapping Your Domain Without a Hosting Account
If you do not have active hosting, your domain’s nameservers must first be pointed to the default nameservers:
- nsa.whogohost.com
- nsb.whogohost.com
Once your nameservers are updated and fully propagated, follow the steps below.
Step 1: Generate CNAME Records from Blogger
- Sign in to your Blogger dashboard.
- Select the blog you want to connect to a domain.

- Click Settings from the left menu.
- Under Publishing, click Custom domain

- Enter your domain in this format: www.yourdomain.com, then click Save.

After saving, two CNAME records will appear. A typical example looks like this:
| Name | Destination |
| www | ghs.google.com |
| abcdx3lllzz | gv-graxx075.dv.googlehosted.com |
Please note that the records above are only a sample. These values are unique for every user. Always use the exact records provided in your Blogger dashboard.
Step 2: Add the Records in Your DNS Manager
- Log in to your client area and go to Domains → Manage DNS.

- Click on Add new Zone and enter your domain name without www in the field for Zone Name.
- Enter this IP address (174.129.25.170) in the IP address field and click the Add zone button.

- Click on the Edit Icon.

- On the row that begins with WWW, replace your domain name with ghs.google.com. Scroll down and click on Save.

- Scroll up and click on add record. Paste the short CNAME (e.g., abcdx3lllzz) into the Name field.

- Select CNAME as the record type.
- Leave TTL at 14400.
- Copy and paste the longer cname (e.g gv-graxx075.dv.googlehosted.com) in the RDATA
- Click on Add record.
- Wait about one hour for DNS propagation.
- Return to your Blogger dashboard and click Save again to finalize the setup.
Option 2: Mapping Your Domain With a Hosting Account
If your domain is hosted, you’ll make the changes from your hosting control panel.
Step 1: Update CNAME Records
- Login to your control panel.
- Navigate to your Advanced Zone Editor under the Domain Module.
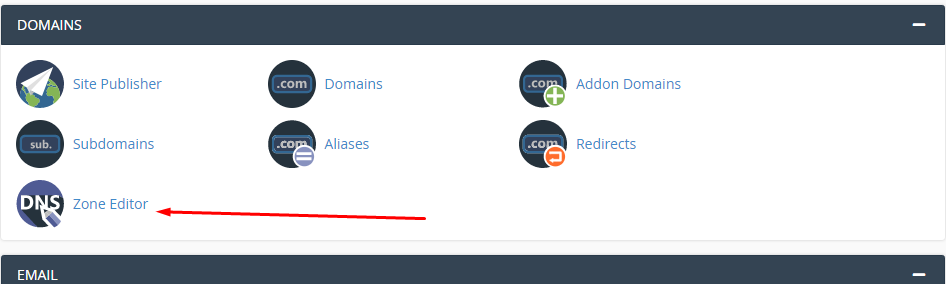
- Click Manage next to the domain you want to your blogger.
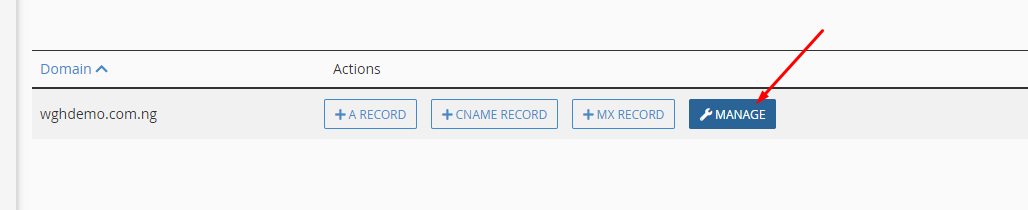
- Locate the www record and click the Edit icon.

- Replace your domain name with ghs.google.com in the Record field and click on Save Record.

- Scroll up and click on add records. Click on the drop-down for TYPE to choose CNAME as your record type.
- Add the short CNAME in the Name Field. The TTL is 14400, and then paste the longer CNAME in the Record field.

- Click on Add record.
Step 2: Redirect the Naked Domain (Optional but Recommended)
To redirect traffic from yourdomain.com to www.yourdomain.com, add the following A records that point to Google IPs:
- 216.239.32.21
- 216.239.34.21
- 216.239.36.21
- 216.239.38.21
Inside your Zone Editor:
- The first record is always the A record, which points your naked domain to our server IP address. Click on Edit. Replace the IP address with one of Google's IP listed above
- Click on Add records. This time, choose A instead of CNAME to add the remaining 3.

Step 3: Restore Email Functionality (MX Records)
Since your domain now points to Google, you must update your MX records to continue receiving emails on your hosting server.
- In your Zone Editor, click on Edit beside the MX records section.
- In the Destination field, replace your domain name with your server on which your account is hosted. You can get this information in your cPanel or your hosting welcome email.

- Return to your Blogger dashboard (where the CNAME records were generated) and click Save to complete the domain connection.
You can also follow the video guide on domain mapping for a visual walkthrough. VIDEO
If you experience any difficulty in the process, please send an email to support@whogohost.com
